Welcome to our comprehensive guide to brow tinting! If you’ve ever dreamed of having perfectly shaped and defined brows, you’ve come to the right place. In this guide, we will take you through everything you need to know about achieving the brows of your dreams through the art of tinting. Whether you’re a beginner or an experienced brow enthusiast, this guide will provide you with expert tips and techniques to help you achieve the perfect brows you’ve always desired.
At the heart of this guide is the concept of achieving perfect brows. We understand that your brows play an essential role in framing your face and enhancing your overall appearance. With brow tinting, you can achieve beautifully defined brows that complement your natural features, giving you a confidence boost like never before.
Throughout this guide, we will cover everything from understanding the basics of brow shaping to the step-by-step process of tinting your brows. We will also explore tips for correcting and perfecting your brow shape post-tint, as well as how to fill in gaps and add definition to achieve a natural look. Additionally, we will address common mistakes to avoid and provide guidance on long-lasting maintenance techniques.
For those with specific concerns such as sensitive skin, we have got you covered with tips and tricks to ensure a smooth tinting experience. We will also discuss how to adapt brow tinting techniques for different brow shapes and explore natural tinting alternatives for those who prefer DIY approaches.
Whether you prefer to tint your brows at home or seek professional services, this guide will equip you with all the knowledge you need to achieve perfect brows. Let’s dive in and unlock the secrets to the brows you’ve always desired!
Key Takeaways:
- There’s no one-size-fits-all when it comes to perfect brows. Brow tinting allows you to enhance and define your natural brow shape.
- Understanding the basics of brow shaping and identifying your natural brow shape is a crucial starting point.
- Choosing the right brow tint, analyzing your skin tone and hair color, and familiarizing yourself with different brands and formulas is essential for optimal results.
- The step-by-step process of tinting your brows involves cleaning and priming, applying the tint correctly, and timing it for the desired shade.
- Don’t forget to correct and perfect your brow shape post-tint using additional techniques and products.
Understanding the Basics of Brow Shaping
In order to achieve perfect brows, it is essential to understand the basics of brow shaping. This involves identifying your natural brow shape and utilizing the right tools. By following these guidelines, you can enhance your brow appearance and ensure a flawless look.
Identifying Your Natural Brow Shape
Before embarking on the journey of brow shaping, it is important to determine your natural brow shape. This will serve as a foundation for achieving the most flattering brow style for your face. Natural brow shapes can vary from arched to straight or even slightly curved. To identify your natural brow shape, follow these simple steps:
- Take a brow brush or a straight object (such as a pencil) and align it vertically along the edge of your nose.
- Keep the brush or object in place while moving it diagonally towards your brow. The point where it intersects with your brow will be your starting point.
- Next, align the brush or object from the edge of your nose to the outer corner of your eye. The point where it intersects with your brow will be your tail point.
- Finally, identify the highest point of your arch by aligning the brush or object from the edge of your nose to the center of your pupil. The point where it intersects with your brow will be your arch point.
Remember, your natural brow shape is unique to you, so embrace it and work with it to achieve the best results.
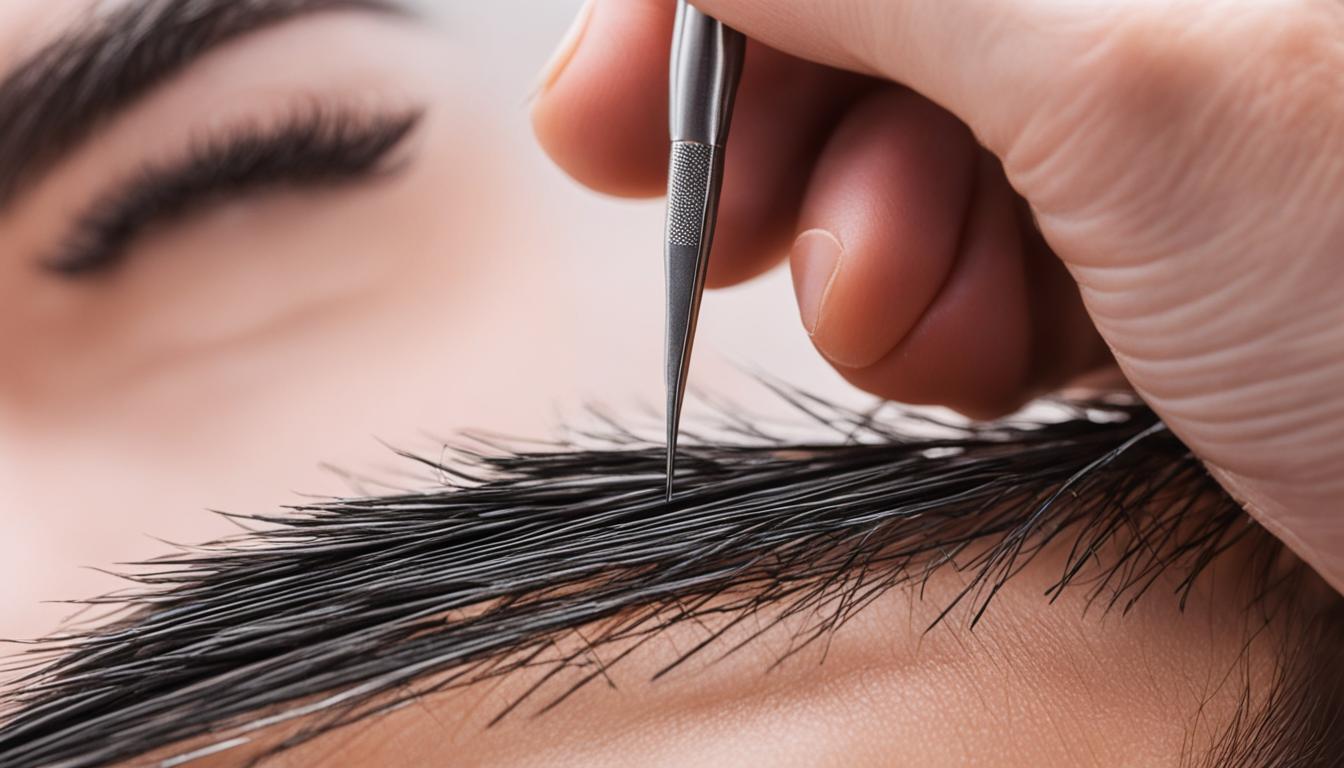
Tools You’ll Need for Perfect Brows
To achieve perfect brows, you’ll need a few essential tools in your beauty arsenal. Here are the must-have tools for brow shaping:
| Tool | Description |
|---|---|
| Tweezers | High-quality tweezers with fine, slanted tips are essential for precise brow shaping. Use them to remove any stray hairs and define your brow shape. |
| Scissors | A small pair of scissors with rounded tips can be used to trim long brow hairs that may be unruly or out of place. |
| Brow Brushes | Brow brushes help in grooming and blending the brow hairs. Use a spoolie brush to comb through your brows and a small angled brush to apply brow powder or pomade for added definition. |
By having these tools at your disposal, you’ll be well-equipped to shape your brows with precision and achieve a polished look.
Preparation: Before You Start Tinting
Before diving into the exciting world of brow tinting, it’s crucial to prepare your brows and skin for the process. Proper preparation ensures optimal results and a seamless tinting experience. Follow these essential steps to set the stage for beautiful, perfectly tinted brows.
Cleansing the Brow Area
A clean canvas is key to achieving a flawless tinted brow look. Start by gently cleansing your brows using a mild facial cleanser or makeup remover. This step removes any dirt, oil, or product buildup that can interfere with the tinting process. Make sure to rinse thoroughly and pat dry with a clean towel.
Trimming Long Hairs
Next, carefully trim any long brow hairs that may obstruct the tint and affect the final shape. Use a pair of small, sharp brow scissors to trim the hairs, following the natural arch of your brows. Be cautious not to cut too much hair, as it may take a while to grow back.
Oil and Cream-Free Skin
Before applying the tint, ensure that your skin is free from any oils or creams. These substances can create a barrier between the tint and the brow hairs, resulting in an uneven application or shorter-lasting results. It’s best to avoid using moisturizers, serums, or any oil-based skincare products on your brows and forehead before tinting.
Now that your brows and skin are prepped and ready, you’re one step closer to achieving perfectly tinted brows! Follow the next section to discover the importance of choosing the right brow tint shade based on your skin tone and hair color.

The Importance of Choosing the Right Brow Tint
When it comes to achieving perfect brows, choosing the right brow tint is of utmost importance. The perfect tint shade can enhance your natural beauty, frame your face, and give you the confidence to take on the day.
Analyzing Skin Tone and Hair Colour
Before diving into the world of brow tints, it’s crucial to analyze your skin tone and hair colour to ensure you select the most suitable shade. Different skin tones and hair colours have specific undertones that can influence how a tint will look on your brows.
For those with fair skin and light hair, opting for a soft, light brown tint can create a natural and subtle look. If you have medium skin and hair, a warm-toned medium brown can add depth and dimension. Darker skin and hair can be complemented by a rich, dark brown tint for a bold and defined brow.
Remember, the key is to find a tint shade that harmonizes with your skin tone and hair colour, creating a cohesive and balanced overall look.
Understanding Tint Formulas and Brands
Choosing the right brow tint involves not only considering the shade but also understanding tint formulas and brands. Different formulas offer various benefits, and certain brands may cater to specific preferences or requirements.
Some tint formulas may be more long-lasting, ensuring your brows stay flawlessly tinted for an extended period. Others may provide a more gradual and natural-looking result. Consider your personal preferences and desired outcome when selecting a formula.
As for brands, there are numerous options available in the market. Research reputable brands known for their quality and reliability. Reading reviews and seeking recommendations can also help in making an informed decision.

Popular Tint Brands and their Features
| Brand | Key Features |
|---|---|
| Anastasia Beverly Hills | Long-lasting, wide range of shades |
| Benefit Cosmetics | Gradual tinting effect, easy to use |
| Godefroy | Professional-grade formulas, salon-quality results |
| Henna Brow Tint | Plant-based, natural-looking results |
Table: Popular Tint Brands and their Features
Remember, choosing the right brow tint is a personal choice, and experimenting with different shades, formulas, and brands can help you find the perfect match for your brows. Take the time to analyze your skin tone, hair colour, and desired outcome, and with the right tint, you’ll be one step closer to achieving your ideal brows.
Step-by-Step Process: How to Tint Your Brows
Tinting your brows is a simple yet effective way to enhance their appearance and achieve a more polished look. Follow this step-by-step process to tint your brows like a pro, ensuring clean and defined results.
Cleaning and Priming Your Brows for Tinting
Before applying the tint, it’s essential to ensure your brows are clean and free from any oils or residues. Use a gentle cleanser or micellar water to cleanse the brow area thoroughly. This step helps the tint adhere better to the brow hairs and yields more even results.
Next, prepare the brows by trimming any long hairs that may interfere with the tinting process. Use a pair of small brow scissors to carefully trim any excess length while maintaining the natural shape of your brows.
Applying the Tint Like a Pro
When applying the tint, it’s crucial to follow the instructions provided with the specific tinting kit you are using. Typically, you’ll mix the tint and developer in a small dish or palette to create the desired shade.
Using a small angled brush, start applying the tint to your brows in the direction of hair growth. Ensure you cover each hair evenly, paying extra attention to sparse areas that may need more coverage.

Be careful not to apply the tint onto the surrounding skin, as it may cause stains or unwanted marks. If any tint stains the skin, quickly wipe it away with a cotton bud or a damp cloth.
Timing Is Everything: How Long to Leave the Tint On
The timing of the tint application is crucial in achieving the desired color intensity. Follow the tint’s instructions to determine the recommended processing time, which may vary depending on the brand you’re using.
Typically, brow tints are left on for about 5 to 10 minutes. However, if you prefer a lighter result, you can shorten the processing time, or if you desire a darker, more intense color, you can leave the tint on for a bit longer.
Once the recommended processing time has elapsed, gently remove the tint by wiping it away with a damp cotton pad or cloth. Take care not to rub or pull on the brow hairs, as this can disrupt the coloration and shape.
Now that you’ve successfully tinted your brows, you can enjoy the enhanced appearance of fuller and more defined brows. To maintain the tinted look, avoid excessive rubbing or cleansing of the brow area and use gentle makeup removers when necessary.
| Step | Actions |
|---|---|
| 1 | Cleanse the brow area to remove oils and residues |
| 2 | Trim any long brow hairs |
| 3 | Mix the tint and developer in a small dish |
| 4 | Apply the tint to the brows in the direction of hair growth |
| 5 | Avoid applying the tint on the surrounding skin |
| 6 | Follow the recommended processing time (5-10 minutes) |
| 7 | Remove the tint with a damp cotton pad |
Correcting and Perfecting Brow Shape Post-Tint
After tinting your brows, it’s essential to ensure that they are shaped and perfected to achieve your desired look. Here are some tips and techniques for correcting and refining your brow shape to enhance symmetry and definition.
1. Assess and Adjust:
Take a close look at your brows post-tint and identify any areas that may require correction. Use a mirror and natural lighting to evaluate the shape and symmetry of your brows.
2. Use a Brow Pencil or Powder:
To correct and perfect your brow shape, consider using a brow pencil or powder. These products can help you fill in any sparse areas, define the edges, and add depth to your brows.
3. Choose the Right Shade:
Ensure that the shade of the brow pencil or powder matches your newly tinted brows for a seamless appearance. If necessary, experiment with different shades to find the perfect match.
4. Define the Arch:
To create a well-defined arch, use the brow pencil or powder to gently outline the shape. Be mindful not to apply too much product, as it can result in an unnatural appearance.
5. Brush and Blend:
Use a clean spoolie brush or a small angled brush to blend the brow pencil or powder, ensuring a natural-looking finish. This will help soften any harsh lines and blend the product seamlessly into your brow hairs.
6. Regular Maintenance:
Keep in mind that brow shape is not a one-time fix. It requires regular maintenance to keep your brows looking their best. Maintain a routine of shaping, grooming, and perfecting your brows to ensure long-lasting results.

By following these tips and techniques, you can correct and perfect your brow shape post-tint, achieving beautifully shaped and symmetrical brows that frame your face and enhance your overall appearance.
Finishing Touches: Filling in Gaps and Adding Definition
In order to achieve perfect brows, it’s important to pay attention to the finishing touches. These final steps can make a significant difference in enhancing the shape of your brows and creating a natural-looking result.
Choosing the Right Brow Pencil or Powder
When it comes to filling in gaps and adding definition to your brows, choosing the right product is key. There are two popular options: brow pencils and brow powders.
A brow pencil is a great choice if you want precise control and the ability to create hair-like strokes. Look for a pencil that matches your brow color and has a fine tip for a more natural look. Start by lightly filling in any sparse areas, following the direction of your natural hair growth.
On the other hand, brow powder is perfect for those who prefer a softer, more diffused look. It works well for filling in larger areas and creating a more natural, blended effect. Use an angled brush to apply the powder in gentle strokes, focusing on the areas that need more definition.
Experiment with both products to see which one works best for you. You can even mix and match them for different effects.
Creating Hair-Like Strokes for Natural-Looking Brows
One of the key goals when filling in your brows is to achieve a natural-looking result. To create hair-like strokes, follow these steps:
- Start by brushing your brow hairs upwards using a spoolie brush or a clean mascara wand. This will help you see any gaps that need to be filled in.
- Using your chosen brow pencil or powder, lightly draw small strokes that mimic the appearance of individual brow hairs. Focus on the areas that need more definition and fill in any gaps.
- Remember to use a light hand and build up the color gradually to avoid an overly harsh or drawn-on look. Blending is key to achieving a natural effect.
- Finally, go over your brows with a clean spoolie brush to blend the product and smooth out any harsh lines or edges. This will create a seamless finish.
By choosing the right brow product and applying it with precision, you can fill in gaps and add definition to your brows, resulting in a natural-looking appearance. Don’t be afraid to experiment and find the techniques that work best for you.

Mistakes to Avoid When Tinting Your Brows
Tinting your brows can be a game-changer for enhancing your overall look. However, like any beauty procedure, it’s essential to be aware of potential mistakes that can occur during the process. By avoiding these common pitfalls, you can ensure beautiful, natural-looking tinted brows.
Over-tinting and How to Avoid It
One of the most common mistakes when tinting brows is overdoing the tint, resulting in overly dark or unnatural-looking brows. To avoid this, it’s important to follow the instructions provided with your chosen tinting product carefully. Start with a conservative amount and gradually build up the intensity if needed. Remember, you can always add more tint, but it’s difficult to remove excess pigment once it’s applied.
In addition, it’s crucial to be mindful of the duration that the tint is left on the brows. Leaving the tint on for too long can lead to darker, harsher results. Set a timer and keep track of the time to ensure you achieve the desired shade. Always err on the side of caution and perform a patch test prior to tinting to assess how your skin reacts.
Ensuring Symmetry Between Brows
Another mistake to avoid is neglecting to achieve symmetry between your brows. The goal of brow tinting is to create a balanced and harmonious look. To help achieve symmetry, start by mapping out your desired brow shape before applying the tint. Use a brow pencil or powder in a shade similar to your natural brow color to lightly outline the shape and fill in any sparse areas. This will serve as a guide when you apply the tint, ensuring that you achieve symmetry between both brows.
Remember to step back and assess your progress as you go along. It’s always better to make small adjustments during the tinting process than to realize later that the brows are uneven. Take your time and be patient, as achieving symmetry may require multiple applications or touch-ups.
By avoiding over-tinting and ensuring symmetry between your brows, you can achieve stunning tinted brows that enhance your natural beauty. Take the time to read and follow the instructions provided with your chosen tinting product, and always prioritize moderation and precision.
Maintenance Tips for Long-Lasting Brow Tint
Once you’ve achieved your desired brow tint, it’s important to maintain its longevity. By following these maintenance tips, you can ensure that your brows stay beautifully tinted for as long as possible.
Avoid Excessive Touching and Rubbing: Refrain from touching or rubbing your brows excessively, as this can cause the tint to fade more quickly. Be mindful when applying skincare products or removing makeup in the brow area to minimize contact with the tinted hairs.
Protect from Sun Exposure: Just like your skin, your tinted brows can be affected by prolonged exposure to the sun. To prevent premature fading, wear a hat or use a brow gel with SPF when spending time outdoors. This will help shield your brows from the harmful effects of UV rays.
Use Suitable Brow Products: When it comes to maintenance, using the right brow products is essential. Opt for gentle cleansers and makeup removers that won’t strip away the tint. Additionally, choose brow pencils, powders, or gels specifically formulated for tinted brows to enhance their color and shape without compromising the longevity of the tint.
Expert Tip: Apply a clear brow gel or wax over the tinted hairs to further seal and protect the color, keeping your brows looking vibrant and fresh for longer.
Adapting Brow Tinting Techniques for Different Brow Shapes
When it comes to brow tinting, one size does not fit all. Adapting your tinting techniques to suit different brow shapes is essential for achieving the best results. Whether you have naturally thin or thick brows, understanding how to tailor your tinting methods is key to enhancing your unique brow shape and creating a flawless look.
Tailoring Tinting Methods to Your Unique Brow Shape
No two sets of eyebrows are exactly alike, and embracing your unique brow shape is essential for personalized results. By analyzing the natural contours of your brows, you can customize the tinting process to enhance their appearance. Fill in any sparse areas while maintaining the natural arch and thickness that make your brows unique. Remember, the goal is to enhance your features, not completely alter them.
Modifying Techniques for Sparse vs Full Brows
Whether you have sparse brows or full brows, adapting tinting techniques can make all the difference. For sparse brows, focus on creating a more defined shape by carefully tinting individual hairs and filling in any gaps. Use a gentle touch to avoid overpowering the brow and maintain a natural look. For those blessed with naturally full brows, a more subtle tinting approach can enhance the color and add depth without overwhelming the existing shape.
By understanding how to adapt brow tinting techniques to different brow shapes, you can achieve beautiful, natural-looking brows that perfectly suit your face. Tailor your tinting methods to enhance your unique brow shape and modify techniques according to whether you have sparse or full brows. With a little practice, you’ll be able to create the perfect brow look that accentuates your natural beauty.
Home Remedies: Natural Tints and Dyes for Brows
Using Natural Ingredients for Brow Tinting
Looking for a more natural approach to brow tinting? Home remedies using natural ingredients can be a great alternative to commercial products. Not only are these remedies cost-effective, but they also allow you to have more control over the ingredients you apply to your brows.
One popular natural ingredient for brow tinting is henna. Henna has been used for centuries to dye hair and skin. It’s a plant-based dye that imparts a reddish-brown tint to your brows, giving them a more defined and polished look. To use henna for brow tinting, mix it with water until it forms a paste-like consistency. Apply the paste to your brows, leave it on for the recommended time, and then rinse off.
Another natural ingredient that can be used for brow tinting is walnut powder. Walnut powder can provide a dark brown color to your brows, making them appear thicker and more voluminous. Mix walnut powder with water or oil to create a paste, apply it to your brows, and leave it on for the desired amount of time before washing off.
These natural ingredients not only add color to your brows but also offer additional benefits for the hair and skin. Henna, for example, can help strengthen the hair follicles and promote eyebrow growth. Walnut powder contains natural oils that moisturize and nourish the brows, keeping them healthy and vibrant.
DIY Brow Tint Recipes and How to Use Them
Now that you know about the natural ingredients you can use for brow tinting, here are a couple of DIY recipes:
-
Henna Brow Tint:
- Ingredients: Henna powder, water
- Mix henna powder with water until it forms a paste.
- Apply the paste to your brows using a clean brush or cotton swab.
- Leave it on for the recommended time mentioned in the instructions.
- Rinse off the henna paste with lukewarm water.
-
Walnut Brow Tint:
- Ingredients: Walnut powder, water or oil
- Mix walnut powder with water or oil to form a paste.
- Apply the paste evenly to your brows using a brush or cotton swab.
- Leave it on for the desired amount of time to achieve your desired shade.
- Wash off the walnut paste with lukewarm water.
It’s important to note that natural brow tints may not offer permanent results like commercial dyes but can provide a temporary solution for those looking to experiment with different shades or fill in sparse areas. Always perform a patch test before using any natural ingredient to ensure you don’t have any adverse reactions.
By harnessing the power of natural ingredients, you can achieve beautifully tinted brows without the need for harsh chemicals. These home remedies provide a safe and effective alternative for those who prefer a more organic approach to brow tinting. Give these DIY recipes a try and enjoy naturally enhanced brows!
Navigating Professional Brow Tinting Services
When it comes to achieving the perfect brows, seeking professional help can make all the difference. Professional brow tinting services offer expertise, precision, and access to high-quality products that can elevate your brow game to the next level.
During a professional brow tinting appointment, you can expect a skilled technician to assess your natural brow shape, taking into account your facial features and personal preferences. They will then recommend the most suitable tint shade to enhance your eyebrows and complement your skin tone and hair color.
Choosing a reputable salon or technician is crucial to ensure you receive the best results. Look for professionals who have experience in brow tinting and positive customer reviews. Ask for recommendations from friends, family, or beauty specialists to find a professional you can trust.
One of the key benefits of seeking professional brow tinting services is the use of high-quality products. Professionals have access to premium tints that are specially formulated for durability and optimal color payoff. These professional-grade products ensure long-lasting and natural-looking results.
By opting for professional brow tinting, you can sit back and relax while the expert takes care of every detail. They will apply the tint with precision, ensuring even coverage and beautifully defined brows. Professionals also have the knowledge and expertise to customize the tinting process based on your unique brow shape and desired outcome.
Whether you’re new to brow tinting or an experienced enthusiast, professional services can take your brow game to new heights. Don’t hesitate to explore the world of professional brow tinting and discover the transformative power of perfectly defined brows.
Brow Tinting for Sensitive Skin: What You Need to Know
Individuals with sensitive skin often face challenges when it comes to beauty treatments. Brow tinting is no exception. However, with the right knowledge and products, it is still possible to achieve beautifully tinted brows without irritation or reactions. In this section, we will discuss important considerations for those with sensitive skin, including choosing hypoallergenic tint formulas and performing a patch test to prevent any adverse reactions.
Choosing Hypoallergenic Tint Formulas
When you have sensitive skin, it’s crucial to select brow tint formulas that are gentle and hypoallergenic. These formulas are specially designed to minimize the risk of allergic reactions and irritations. Look for products that are free from harsh chemicals, fragrances, and dyes that can aggravate sensitive skin. Opt for tint formulas that prioritize nourishing and soothing ingredients to ensure a comfortable experience.
It’s also helpful to read product reviews from individuals with similar skin types to gain insights into which brands and formulas have been well-received. Remember, everyone’s skin is unique, so it may take some trial and error to find the perfect hypoallergenic tint formula for you.
How to Patch Test to Prevent Reactions
Prior to tinting your eyebrows, it’s essential to perform a patch test to check for any potential adverse reactions. Patch testing involves applying a small amount of the tint formula to a discreet area of your skin, such as behind the ear or on the inner forearm. Wait for at least 24 hours to observe any signs of irritation, redness, or swelling. If no reaction occurs, it is generally safe to proceed with tinting your eyebrows.
To perform a patch test:
- Cleanse the patch test area on your skin with a gentle cleanser and pat it dry.
- Apply a small amount of the brow tint formula to the patch test area.
- Allow the tint to dry completely and avoid touching or disturbing it.
- Observe the patch test area for any signs of irritation or allergic reactions over the next 24 hours.
If you experience any adverse reactions during or after the patch test, it is recommended to avoid using that specific tint formula and consult with a dermatologist or skincare professional for further guidance.
By choosing hypoallergenic tint formulas and performing a patch test beforehand, individuals with sensitive skin can minimize the risk of reactions and enjoy the benefits of beautifully tinted brows.
How to Accentuate Your Tinted Brows with Makeup
Once you have beautifully tinted brows, you can further enhance their appearance using makeup techniques that complement your brow tint. Selecting the right makeup products and employing highlighting techniques can help accentuate and define your tinted brows.
Selecting Makeup That Complements Your Brows
When choosing makeup products for your tinted brows, opt for shades that harmonize with your brow tint and skin tone. Aim for a shade that is slightly lighter than your brow color to avoid an overly harsh or unnatural look. Consider using a brow pencil or powder in a shade that matches your hair color to fill in any sparse areas and add depth to your brows. Additionally, using a brow gel or mascara can help set and define the shape of your brows, providing a polished and finished appearance.
Highlighting Techniques to Enhance Brow Definition
Highlighting is a great technique to enhance the definition of your tinted brows. Using a matte or shimmer highlighter, apply a small amount beneath your brow arches and blend it in gently. This will help to lift and accentuate the brow shape, giving them a more defined and polished look. Avoid using overly glittery or metallic highlighters, as they can detract from the natural appearance of your brows.
To further emphasize your brow shape, consider using a matte eyeshadow in a shade slightly darker than your brow color. Using an angled brush, apply the eyeshadow along the bottom edge of your brows, following their natural shape. This simple technique can add dimension and create a more defined look.
Remember, subtlety is key when it comes to accentuating your tinted brows with makeup. The goal is to enhance their natural beauty and complement your overall look, rather than overpowering or altering them completely.
Frequently Asked Questions About Brow Tinting
Brow tinting is a popular beauty trend that can enhance your eyebrows and give them a fuller and more defined look. If you’re considering brow tinting or have recently had it done, you may have some questions. In this section, we’ll address frequently asked questions about brow tinting to provide you with the answers you need to know.
-
How long do brow tinting results last?
The duration of brow tinting results can vary depending on several factors, such as your skin type, hair growth cycle, and how well you maintain your tinted brows. On average, brow tinting results can last anywhere from 4 to 6 weeks. It’s important to note that the tint will gradually fade over time, so you may need touch-ups to maintain the desired look.
-
Are there any potential side effects of brow tinting?
When performed by a trained professional using high-quality products, brow tinting is generally safe. However, some individuals may experience minor side effects, such as skin irritation or temporary darkening of the skin. It’s essential to have a patch test done before the procedure to check for any allergic reactions. If you have sensitive skin or a history of allergies, it’s best to consult with a professional before getting your brows tinted.
-
What is the maintenance routine for tinted brows?
To prolong the lifespan of your tinted brows, it’s important to follow a proper maintenance routine. Avoid excessive touching or rubbing of the brows, as this can cause the tint to fade faster. Additionally, protect your tinted brows from direct sun exposure by wearing SPF-infused brow products or using a hat or sunglasses. It’s also recommended to avoid using oil-based makeup products on your brows, as they can break down the tint more quickly.
If you have any other questions or concerns about brow tinting, it’s always best to consult with a professional aesthetician or brow specialist. They can provide personalized advice based on your specific needs and help you achieve the perfect brows you desire.
«Brow tinting can enhance your natural beauty and give you more defined eyebrows.»
| Question | Answer |
|---|---|
| How long do brow tinting results last? | On average, brow tinting results can last anywhere from 4 to 6 weeks. |
| Are there any potential side effects of brow tinting? | Some individuals may experience minor side effects, such as skin irritation or temporary darkening of the skin. |
| What is the maintenance routine for tinted brows? | To prolong the lifespan of your tinted brows, avoid excessive touching, protect them from sun exposure, and avoid using oil-based makeup products on the brows. |
Conclusion
As we near the end of this comprehensive guide, it’s clear that achieving perfect brows is within everyone’s reach. By following the expert tips and techniques provided throughout this article, you can take your brow game to the next level.
Remember, understanding your natural brow shape is the first step towards creating a flawless look. Investing in the right tools and choosing the perfect brow tint can make all the difference in achieving the desired results.
With the step-by-step process detailed here, you’ll have the knowledge and confidence to tint your brows like a pro. And don’t forget the importance of correcting and perfecting your brow shape post-tint, as well as filling in gaps and adding definition for that finishing touch.
Whether you choose to explore home remedies or opt for professional services, maintaining your tinted brows is crucial for long-lasting results. And for those with sensitive skin, we’ve provided valuable information on how to make brow tinting a safe and enjoyable experience.
In conclusion, with the right techniques, products, and maintenance routine, anyone can achieve perfect brows. So put your newfound knowledge into practice and get ready to show off those beautifully tinted brows. Remember, your brows frame your face and can make a significant impact on your overall appearance. It’s time to embrace the power of the perfect brow!
FAQ
How important is it to achieve perfect brows?
Achieving perfect brows is essential as they frame the face and can enhance one’s overall appearance.
What will this comprehensive guide to brow tinting cover?
This comprehensive guide will provide expert tips and techniques for brow tinting, ensuring you achieve the perfect brows you desire.
How can I identify my natural brow shape?
Identifying your natural brow shape involves observing the natural arch, thickness, and alignment of your existing eyebrows.
What tools do I need for perfect brows?
To achieve perfect brows, you will need essential tools such as tweezers, scissors, and brow brushes for shaping and grooming.
What preparation steps should I take before starting the brow tinting process?
Before starting the brow tinting process, it is important to cleanse the brow area, trim any long hairs, and ensure the skin is free from oils or creams.
How do I choose the right brow tint?
Choosing the right brow tint involves analyzing your skin tone and hair color to select the most suitable tint shade. It also includes understanding different tint formulas and popular brands available in the market.
Can you provide a step-by-step process for tinting my brows?
Certainly! The step-by-step process includes cleaning and priming your brows, applying the tint like a pro, and determining the appropriate amount of time to leave the tint on for optimal results.
What can I do to correct and perfect my brow shape after tinting?
After tinting your brows, you can refine the shape and achieve symmetry by using a brow pencil or powder for additional definition.
How can I fill in gaps and add definition to my brows?
To fill in gaps and add definition, you can choose the right brow pencil or powder and use techniques that create hair-like strokes for natural-looking brows.
What mistakes should I avoid when tinting my brows?
It is important to avoid over-tinting and ensure symmetry between brows by following the recommended tinting techniques and taking precautions.
Do you have any maintenance tips for long-lasting brow tint?
Yes, it’s crucial to avoid excessive touching or rubbing of the brows, protect them from sun exposure, and use suitable brow products for upkeep to ensure long-lasting brow tint.
How can I adapt brow tinting techniques to different brow shapes?
Brow tinting techniques can be tailored to different brow shapes by adjusting the tinting methods to suit your unique brow shape. Sparse brows and full brows may require different strategies.
Are there any natural tints or dyes I can use for my brows?
Yes, there are home remedies and natural solutions for brow tinting. You can use natural ingredients and follow DIY recipes for brow tinting, enhancing your brows in a more organic way.
What should I consider when navigating professional brow tinting services?
When seeking professional brow tinting services, it is important to understand what to expect during an appointment, how to choose a reputable salon or technician, and the potential benefits of professional help.
Is brow tinting suitable for sensitive skin?
Brow tinting can be suitable for sensitive skin. Choosing hypoallergenic tint formulas and performing a patch test beforehand can help prevent adverse reactions.
How can I accentuate my tinted brows with makeup?
To accentuate tinted brows, you can select makeup products that complement your brow tint and use highlighting techniques to enhance brow definition.
What are some frequently asked questions about brow tinting?
Frequently asked questions about brow tinting include concerns about the duration of results, potential side effects, and recommended maintenance routines.