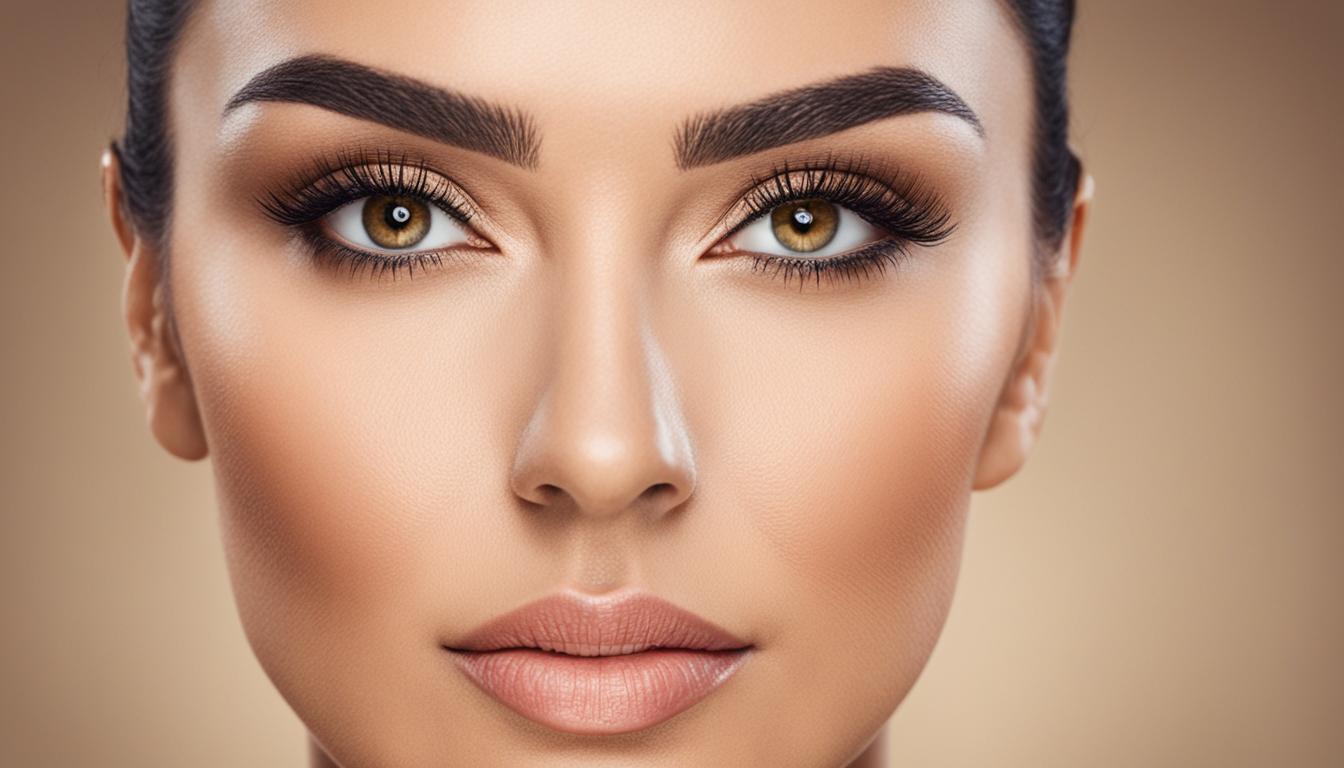
Welcome to our ultimate guide to achieving perfect brows through the art of brow tinting and shaping. Whether you’re a beginner or an experienced brow enthusiast, this comprehensive guide will provide you with all the knowledge and techniques you need to transform your brows into stunning masterpieces. Say goodbye to unruly and sparse brows, and hello to beautifully defined arches that frame your face with confidence.
Having perfectly shaped and tinted brows can make a world of difference to your overall appearance. They have the power to enhance your natural features, complement your facial structure, and elevate your entire makeup look. But achieving those perfect brows requires understanding the art of brow tinting and shaping, and that’s exactly what we’re here to teach you.
In this ultimate guide, we will take you on a journey from the basics of brow shaping to the intricate process of brow tinting. You’ll learn how to identify your natural brow shape, select the right tools and tint shades, and master the step-by-step process of tinting your brows like a pro. We’ll also explore post-tinting care, common mistakes to avoid, and additional techniques to accentuate your tinted brows with makeup.
By the end of this guide, you’ll have all the knowledge and skills necessary to achieve perfect brows that effortlessly complement your unique features. So, let’s dive in and discover the secrets to achieving the brows of your dreams.
Key Takeaways:
- Achieve perfect brows through the art of brow tinting and shaping.
- Master the step-by-step process of tinting your brows like a pro.
- Learn how to identify your natural brow shape and select the right tools and tint shades.
- Discover post-tinting care techniques and common mistakes to avoid.
- Explore techniques to accentuate your tinted brows with makeup.
Understanding the Basics of Brow Shaping
When it comes to achieving perfect brows, understanding the basics of brow shaping is essential. By identifying your natural brow shape and using the right tools, you can create brows that beautifully frame your face.
Identifying Your Natural Brow Shape
Before shaping your brows, it’s important to identify your natural brow shape. This will serve as a foundation for determining the best shape that suits your face. Typically, there are six common brow shapes:
- Angular
- Rounded
- Soft-angled
- S-shaped
- Straight
- Curved
To identify your natural brow shape, look in the mirror and observe the way your brow hair grows. Pay attention to the arch, length, and overall curvature of your brows. Understanding your natural shape will help you decide where to trim, tweeze, or fill in for a balanced and polished look.
Tools You’ll Need for Perfect Brows
To achieve perfect brows, having the right tools is crucial. Here are the essential tools you’ll need:
| Tool | Usage |
|---|---|
| Brow Brush or Spoolie | To groom and tame unruly brow hairs |
| Tweezers | To remove unwanted stray hairs |
| Brow Scissors | To trim excessively long brow hairs |
| Brow Pencil or Powder | To fill in sparse areas and define the brows |
| Brow Gel | To set and hold the brows in place |
These tools will assist you in shaping, grooming, filling in, and defining your brows with precision and ease. Ensure that they are of high quality to achieve the best results.
Preparation: Before You Start Tinting
Proper preparation is essential for achieving optimal results when tinting your brows. By following a few simple steps, you can ensure that your brow tinting process goes smoothly and yields the desired outcome.
Before you begin, it’s crucial to clean and prime your brows to remove any dirt, oils, or makeup residue. This step helps create a clean canvas for the tint to adhere to, resulting in a more even and long-lasting color.

When cleaning your brows, use a gentle cleanser or micellar water to ensure that you remove any impurities without harshly stripping the skin. You can also use a soft brush or spoolie to gently exfoliate the brow area, promoting better color absorption.
After cleansing, it’s important to prime your brows. This can be done by applying a thin layer of petroleum jelly or a specialized brow primer. Priming helps nourish and condition the brows, allowing the tint to penetrate the hair shaft more effectively. It also helps protect the surrounding skin from potential staining.
Once your brows are clean and primed, you’re ready to start the tinting process. Ensure that you have all the necessary tools and products within reach, such as tinting solution, developer, mixing bowl, and applicator.
Note: It’s essential to read and follow the instructions provided with your brow tinting kit or professional products. Each product may have specific guidelines and precautions that need to be followed for best results and safety.
By properly preparing your brows before tinting, you can achieve more precise and longer-lasting results. Take the time to clean, prime, and gather your materials, and you’ll be well on your way to achieving beautifully tinted brows.
The Importance of Choosing the Right Brow Tint
Analyzing Skin Tone and Hair Colour
When it comes to brow tinting, one size does not fit all. Choosing the right brow tint is crucial to achieving the desired look that enhances your natural features. One of the key factors to consider is your skin tone, as it will influence the shade of tint that complements your brows and overall appearance. Individuals with fair skin tones may opt for lighter shades, while those with medium to deep skin tones might choose richer, darker shades for a more defined look.
Equally important is considering your hair colour. The shade of your hair can impact the tint colour that harmonizes well with your brows. If you have naturally blonde or light brown hair, a tint that matches or slightly darkens your brow colour can create a soft and natural effect. On the other hand, individuals with dark brown or black hair may prefer a darker tint to achieve more dramatic and defined brows.
Understanding Tint Formulas and Brands
In addition to skin tone and hair colour, understanding different tint formulas and brands is essential in choosing the right brow tint. Tint formulas can vary, such as those that are water-based or cream-based. Water-based tints tend to offer more subtle and natural-looking results, while cream-based tints provide a more intense and long-lasting effect.
There are various reputable brands in the market that offer a wide range of brow tinting products. Whether you prefer luxury brands or budget-friendly options, it’s crucial to select a reputable brand known for its quality and safety. Research reviews and consult professionals to find trusted brands that cater to your specific needs and preferences.
By taking into account factors such as skin tone, hair colour, tint formulas, and brands, you can make an informed decision when choosing the right brow tint that will enhance your natural beauty and give you flawless brows.
Step-by-Step Process: How to Tint Your Brows
Tinting your brows is a simple process that can enhance and define your natural brows. With the right technique and products, you can achieve beautifully tinted brows at home. Follow this step-by-step guide to get started.
Cleaning and Priming Your Brows for Tinting
- Start by cleansing your brows with a gentle cleanser or micellar water. This will remove any oils, dirt, or makeup residue that might interfere with the tinting process.
- Once your brows are clean and dry, apply a thin layer of petroleum jelly or a brow barrier cream around your brows. This will create a barrier and prevent the tint from staining the surrounding skin.
Applying the Tint Like a Pro
Now, it’s time to apply the tint to your brows. Follow these steps for precise application:
- Prepare the tint according to the product instructions. Mix the tint and developer in a designated tinting dish or container.
- Using a disposable mascara wand or a clean spoolie brush, gently brush the tint onto your brows in the direction of hair growth. Make sure to coat each hair evenly.
- If you want a more defined shape, you can use a small angled brush to apply the tint along the edges of your brows. This will create a cleaner, more polished look.
Timing Is Everything: How Long to Leave the Tint On
The duration for leaving the tint on will depend on the brand and the desired intensity of the tint. Refer to the instructions on your specific tinting kit, but generally, the tint should be left on for 10-15 minutes.
Keep a close eye on the tint during the process to ensure that you achieve the desired shade. You can wipe off a small section of the tint with a damp cotton pad after 10 minutes to check the color. If you want a darker shade, you can leave the tint on for a few more minutes.
Once the desired time has passed, gently remove the tint using a damp cotton pad or a moistened tissue, wiping in the direction of hair growth. Make sure to remove all traces of the tint from your brows.
Now that you’ve completed the tinting process, take a moment to marvel at your beautifully tinted brows. The color should be enhanced, and your brows should appear fuller and more defined. Remember to follow the tinting instructions carefully and perform a patch test beforehand to avoid any adverse reactions.
Correcting and Perfecting Brow Shape Post-Tint
After completing the brow tinting process, it’s important to ensure that the brow shape is corrected and perfected to achieve the desired look. Correcting any imperfections and grooming the brows will help enhance the overall appearance. Here are some techniques to help you achieve the perfect brow shape post-tint:
1. Evaluate andshape accordingly: Start by examining your brows and identifying any areas that may require correction. Use a spoolie brush or eyebrow comb to brush the hairs in their natural direction and decide on the shape that best suits your face. Use small, precise motions when shaping the brows to avoid over-plucking or creating an unnatural appearance.
2. Fill in sparse areas: If you notice any gaps or thinning areas in your brows, filling them in with an eyebrow pencil or powder can help create a fuller look. Choose a shade that matches your natural hair color and use short, feather-like strokes to mimic the appearance of real brow hairs.
3. Trim excess length: Tinted brows may sometimes have longer hairs that need to be trimmed. Use a pair of eyebrow scissors to carefully trim any excess length, ensuring that you maintain the desired shape and symmetry.
4. Use concealer for precision: Applying a small amount of concealer around the eyebrows can help define the shape and clean up any jagged edges. Use a concealer brush or a cotton swab to precisely apply the concealer, blending it gently for a seamless finish.
5. Seek professional assistance: If you’re unsure about correcting and perfecting your brow shape post-tint, it’s always recommended to seek professional assistance. A trained eyebrow technician can help shape your brows to perfection and provide expert advice on achieving the desired look.
Remember, correcting and perfecting brow shape post-tint requires patience and practice. Take your time to groom your brows carefully and experiment with different techniques until you achieve the desired results.
| Correcting and Perfecting Brow Shape Post-Tint |
|---|

|
Finishing Touches: Filling in Gaps and Adding Definition
Once you have achieved the perfect brow shape through tinting and shaping, it’s time to add those finishing touches that will enhance your overall brow look. This section will provide you with valuable tips on filling in any gaps and adding definition to your brows, ensuring a flawless and natural appearance.
Choosing the Right Brow Pencil or Powder
When it comes to filling in gaps and adding definition to your brows, choosing the right brow pencil or powder is crucial. The right product will not only complement your brow color but also allow you to achieve the desired level of precision and natural-looking results.
Consider factors such as your brow color, whether you prefer a pencil or powder formula, and the level of control you need. Opt for a brow pencil or powder that matches your brow shade closely for a seamless and natural finish. Experiment with different brands and formulas to find the one that works best for you.
Creating Hair-Like Strokes for Natural-Looking Brows
To achieve natural-looking brows, it’s essential to create hair-like strokes with your chosen brow product. This technique mimics the appearance of real eyebrow hairs, resulting in a more realistic and defined look.
Start by using short, light strokes to fill in any gaps or sparse areas within your brows. Follow the direction of your natural hair growth and avoid applying too much pressure, as this can lead to a harsh or unnatural finish. The goal is to create gentle strokes that blend seamlessly with your existing brow hairs, achieving a naturally fuller appearance.
For a more precise application, you can also use a fine-tipped brow brush to carefully draw individual strokes. This technique allows you to have greater control and achieve a more realistic finish.
Remember, practice makes perfect when it comes to creating hair-like strokes. Don’t be discouraged if it takes a few tries to get it just right. With time and patience, you’ll be able to master this technique and achieve the perfect brows you’ve always desired.
| Brow Products | Key Features |
|---|---|
| Brow Pencil | — Precise application — Buildable color — Convenient for on-the-go touch-ups |
| Brow Powder | — Soft, natural finish — Suitable for filling in gaps and adding definition — Blends seamlessly with existing brow hairs |
Mistakes to Avoid When Tinting Your Brows
When it comes to brow tinting, mistakes can happen even to the most experienced individuals. To ensure that your brow tinting session goes smoothly and yields beautiful results, it’s essential to be aware of common pitfalls and how to avoid them. This section will highlight two key mistakes to watch out for: over-tinting and asymmetry between brows.
Over-Tinting and How to Avoid It
Over-tinting occurs when the brow tint is left on for too long or is applied too heavily, resulting in brows that appear dark or unnatural. To prevent over-tinting, it’s crucial to carefully follow the recommended application time provided by the tint manufacturer. Be sure to set a timer and remove the tint promptly once the recommended time has elapsed.
Additionally, using the correct amount of tint is essential to avoid over-tinting. Applying too much tint can lead to excessive color saturation, while using too little may result in uneven or patchy results. Remember to apply the tint in thin, even strokes, ensuring that each hair is coated but not overly saturated.
Ensuring Symmetry Between Brows
Another common mistake in brow tinting is failing to achieve symmetry between the two brows. Asymmetrical brows can create an unbalanced and disheveled appearance. To ensure symmetry, it’s important to take the time to carefully compare and adjust both brows during the tinting process.
A helpful tip for achieving symmetry is to use a brow pencil or powder to lightly outline the desired shape and arch of the brows before applying the tint. This can serve as a guide, helping you ensure that both brows are tinted in a consistent manner.

Maintenance Tips for Long-Lasting Brow Tint
Once you’ve achieved your perfect brows through tinting, it’s important to maintain their beautiful appearance. By following these maintenance tips, you can ensure that your brow tint lasts as long as possible.
1. Cleanse gently: Cleanse your brow area with a mild cleanser to remove any dirt or oils that can affect the longevity of your tint. Be careful not to rub or scrub too vigorously, as this can fade the tint prematurely.
2. Groom with care: When grooming your tinted brows, use a soft eyebrow brush or spoolie to comb through them. Avoid using harsh tools or excessive force, as this can cause the tint to fade or become patchy.
3. Avoid excessive moisture: Limit exposure to water on your brows, especially immediately after tinting. Excessive moisture can cause the tint to fade faster. If you need to wet your face, be sure to pat your brows dry gently afterwards.
4. Sun protection is key: Apply sunscreen to your brow area whenever you’re exposed to the sun. Sun exposure can cause the tint to fade more quickly, so it’s important to protect your brows from harmful UV rays.
5. Avoid oil-based products: Oil-based skincare and makeup products can break down the tint more quickly. Opt for water-based or powder-based products instead, especially when applying makeup to your brows.
6. Touch up when necessary: If you notice any areas where the tint has faded or become uneven, you can touch up your brows with a brow pencil or brow powder. Choose a shade that matches your tinted brow color closely for a seamless finish.
By incorporating these maintenance tips into your routine, you can enjoy long-lasting and beautifully tinted brows. Remember, proper care and attention will help you get the most out of your brow tinting experience.
Adapting Brow Tinting Techniques for Different Brow Shapes
When it comes to achieving perfect brows, one size does not fit all. Every individual has a unique brow shape that requires tailored tinting techniques for optimal results. Adapting your tinting methods to suit different brow shapes is essential in creating a customized look that enhances your natural features. Whether you have sparse brows that need extra definition or full brows that require subtle modifications, understanding how to adapt tinting techniques is key.
Tailoring Tinting Methods to Your Unique Brow Shape
Before delving into the tinting process, it is crucial to identify and understand your unique brow shape. Each individual has a different arch, thickness, and length to their brows, and these factors play a significant role in determining the tinting techniques that would work best. By assessing your brow shape, you can create a personalized tinting plan to enhance and accentuate your natural features.
For example, if you have naturally arched brows, you may want to focus on maintaining the shape and adding subtle definition. On the other hand, if you have straight brows, you can use tinting techniques to create a more defined arch. By tailoring the tinting methods to suit your unique brow shape, you can achieve a naturally beautiful look that complements your face.
Modifying Techniques for Sparse vs Full Brows
When it comes to modifying techniques for sparse and full brows, the approach varies. Sparse brows may benefit from tinting techniques that add more depth and fullness. By using a tint shade that matches your natural hair color, you can create the illusion of thicker brows. Additionally, techniques such as feathering can be used to fill in sparse areas and create a seamless, natural look.
On the other hand, if you have naturally full brows, you may want to focus on enhancing their shape and maintaining a clean appearance. Tinting can be used to add subtle definition and highlight the natural arch of your brows. By modifying techniques to enhance the existing fullness of your brows, you can achieve a polished and well-groomed look.
Remember, adapting tinting techniques to different brow shapes is all about enhancing your natural features and achieving a look that is uniquely yours. By understanding your brow shape and making the necessary modifications, you can create beautifully tinted brows that frame your face and boost your confidence.

Home Remedies: Natural Tints and Dyes for Brows
When it comes to brow tinting, you don’t always have to rely on commercial products. Natural ingredients can be just as effective in achieving beautifully tinted brows. Not only are they gentle on the skin, but they also offer a more sustainable and affordable alternative. In this section, we’ll explore the world of natural tints and dyes, and how you can create your own DIY brow tint recipes using readily available ingredients.
Using Natural Ingredients for Brow Tinting
One of the key advantages of using natural ingredients for brow tinting is the avoidance of harsh chemicals that may cause irritation or allergic reactions. Natural tints are typically derived from plant-based sources, such as henna, indigo, or walnut hulls, and they offer a safer option for those with sensitive skin. These ingredients can provide a range of shades that can be customized to match your desired brow color.
Not only do natural ingredients offer a safer choice, but they can also provide beneficial properties for your brows. For example, henna can help strengthen and nourish the brow hairs, promoting healthier and fuller-looking brows. This makes natural tints an ideal choice for those looking to enhance their brow appearance while also caring for their brows in the long run.
By incorporating natural ingredients into your brow tinting routine, you can achieve stunning results while minimizing the risk of adverse reactions and promoting overall brow health.
DIY Brow Tint Recipes and How to Use Them
Creating your own DIY brow tint recipes is not only fun but also allows you to tailor the color and intensity of the tint according to your preferences. Here are a few popular recipes you can try:
- Henna and Indigo Tint: Mix equal parts of henna and indigo powder with warm water to form a paste. Apply the paste to your brows and leave it on for the recommended time. Rinse off and enjoy beautifully tinted brows.
- Walnut Hull Tint: Crush walnut hulls to create a fine powder. Mix the powder with water to create a paste and apply it to your brows. Allow it to sit for the desired duration before rinsing off and revealing naturally tinted brows.
- Chamomile Tea Tint: Brew a cup of chamomile tea and allow it to cool. Dip a clean mascara wand or cotton swab into the tea and brush it onto your brows. Repeat this process several times for a subtle tint.
Remember, the key to successful DIY brow tinting is experimentation. Adjust the ingredients and ratios to achieve your desired shade and intensity. Always perform a patch test before applying the tint to your entire brows to ensure you don’t have any adverse reactions.
Using natural ingredients for brow tinting is a wonderful way to not only enhance your brows but also indulge in self-care and sustainability. Try out different DIY brow tint recipes to discover the perfect natural tint that suits your style and preferences.

Navigating Professional Brow Tinting Services
If you’re looking to achieve flawlessly tinted brows, seeking professional assistance can be a game-changer. Professional brow tinting services offer numerous advantages, ensuring you get the best results possible. Here’s what you need to know when navigating the world of professional brow tinting:
- Research reputable salons or technicians: Start by doing some research to find reputable salons or technicians in your area. Look for establishments that specialize in brow tinting and have a track record of delivering high-quality results.
- Read reviews and testimonials: Before booking an appointment, take the time to read reviews and testimonials from previous clients. This can give you valuable insights into the technician’s skill, professionalism, and the overall quality of their services.
- Ask for recommendations: Reach out to friends, family, or colleagues who have had their brows professionally tinted. Ask for recommendations and gather firsthand experiences to help you make an informed decision.
- Consultation: Many professional salons offer consultations before the tinting service. During this appointment, you can discuss your desired brow shape and color, as well as any concerns or questions you may have. This ensures that both you and the technician are on the same page, leading to optimal results.
- Experience and qualifications: Consider the experience and qualifications of the salon or technician. Look for professionals who are trained and certified in brow tinting techniques. This ensures that you’re in capable hands and can trust them to enhance your brows safely.
When opting for professional brow tinting services, it’s essential to consider factors such as reputation, expertise, and client testimonials. By doing your research and choosing a reputable salon or technician, you can enjoy the benefits of professional expertise and achieve stunning, long-lasting results.
Enhance your brow game with the help of professional brow tinting services. Expert technicians and reputable salons can transform your brows, giving you the desired shape and color you’ve always wanted.
Brow Tinting for Sensitive Skin: What You Need to Know
If you have sensitive skin and are interested in brow tinting, it’s important to take extra precautions to avoid any potential adverse reactions. In this section, we’ll discuss some essential tips and guidelines to ensure a safe and enjoyable brow tinting experience.
Choosing Hypoallergenic Tint Formulas
When it comes to brow tinting for sensitive skin, choosing the right tint formula is crucial. Look for products specifically labeled as hypoallergenic, as they are formulated to be gentler on the skin and less likely to cause irritation or allergic reactions. Opt for natural-based or vegetable-based dyes that contain fewer harsh chemicals.
How to Patch Test to Prevent Reactions
Patch testing is an important step in preparation for brow tinting, particularly for those with sensitive skin. It involves applying a small amount of the tint to a small area of the skin, such as behind the ear or on the inner arm, and monitoring for any adverse reactions, such as redness, itching, or swelling.
To perform a patch test:
- Cleanse and dry the chosen patch test area.
- Apply a small amount of the tint with a cotton swab or clean fingertip.
- Allow the tint to dry, and avoid washing or touching the area for at least 24 hours.
- Monitor the patch test area for any signs of irritation or allergic reactions.
- If no adverse reactions occur within 48 hours, it is generally safe to proceed with brow tinting.
Remember, even if you have used a particular tint product before without any issues, it is still essential to patch test every time you tint your brows, as sensitivities can develop or change over time.
How to Accentuate Your Tinted Brows with Makeup
Selecting Makeup That Complements Your Brows
Once you’ve achieved perfectly tinted brows, it’s time to take your look to the next level by accentuating them with makeup. A well-selected and expertly applied makeup can enhance the shape and color of your tinted brows, giving your face a polished and defined appearance.
When selecting makeup products to complement your tinted brows, it’s essential to consider their undertones and hues. Opt for eyebrow pencils, powders, or gels that closely match the color of your tinted brows. To create a harmonious and natural look, choose a product that is a shade or two lighter or darker than your brow tint, depending on your desired intensity.
Experiment with different textures and formulas to find the one that works best for you. While powder-based products offer a softer and more natural finish, pencils and gels provide precision and definition. Consider your personal style and desired eyebrow effect when making your selection.
Remember, the key is to complement your tinted brows, not overpower them, so choose makeup products that enhance your natural beauty and bring attention to your brows without overpowering your entire face.
Highlighting Techniques to Enhance Brow Definition
In addition to selecting the right makeup products, you can further enhance the definition of your tinted brows through strategically placed highlights. Highlighting your brows not only adds dimension but also helps to accentuate their shape and arch.
One effective technique is to apply a highlighter or light-colored eyeshadow directly beneath the brow bone. This creates a lifted and more defined appearance, drawing attention to your beautifully tinted brows. Use a small brush or your fingertip to gently blend the highlighter into the skin for a seamless look.
Another highlighting technique involves using a shimmering or matte eyeshadow in a shade lighter than your brow tint to add a subtle shimmer or matte finish to the browbone. Apply this shadow sparingly along the browbone, focusing on the inner half to create a soft, radiant effect.
Remember to blend well and avoid any harsh lines for a natural and polished finish. By incorporating highlighting techniques as part of your brow makeup routine, you can elevate the look of your tinted brows and make them the focal point of your face.
| Makeup Products to Complement Tinted Brows | Highlighting Techniques |
|---|---|
| Choose eyebrow pencils, powders, or gels that closely match the color of your brow tint | Apply a highlighter or light-colored eyeshadow beneath the brow bone to create a lifted appearance |
| Consider the texture and formula that suit your desired brow effect | Apply a shimmering or matte eyeshadow in a shade lighter than your brow tint along the browbone for a subtle shimmer or matte finish |
| Avoid overpowering your brows and choose complementary, not clashing, shades | Blend well to create a natural look and avoid harsh lines |
Frequently Asked Questions About Brow Tinting
Have questions about brow tinting? Don’t worry; we’ve got you covered. Here are some commonly asked questions about brow tinting, along with informative answers and guidance to help you better understand the process.
Q: How long does brow tinting last?
A: The duration of brow tinting can vary depending on factors such as skin type, product quality, and aftercare. On average, brow tinting typically lasts between 4 to 6 weeks.
Q: Is brow tinting painful?
A: Brow tinting is generally painless. However, some individuals may experience a slight tingling sensation during the tint application process. If you have particularly sensitive skin, it’s recommended to perform a patch test before applying the tint to ensure compatibility and minimize any potential discomfort.
Q: Can I tint my eyebrows at home?
A: Yes, you can tint your eyebrows at home. However, it’s crucial to follow proper safety precautions and instructions provided by the tint manufacturer. If you’re unsure or have limited experience, it’s advisable to seek professional assistance to ensure the best results.
Q: Can I still shape and groom my brows after tinting?
A: Absolutely! In fact, brow tinting can enhance the appearance of your shaped and groomed brows. Once the tinting process is complete, you can continue shaping and maintaining your brows as usual, using techniques like tweezing, threading, or waxing to achieve your desired shape.
| Question | Answer |
|---|---|
| Q: How often should I get my brows tinted? | A: The frequency of brow tinting varies from person to person. It’s generally recommended to get them tinted every 4 to 6 weeks to maintain optimal color and definition. |
| Q: Can I wear makeup after brow tinting? | A: Yes, you can wear makeup after brow tinting. However, it’s advisable to wait for at least 24 hours before applying any cosmetics to allow the tint to set and achieve maximum longevity. |
| Q: Is brow tinting suitable for everyone? | A: Brow tinting is generally safe for most individuals. However, people with certain allergies, skin conditions, or sensitivities should consult with a professional or perform a patch test to assess suitability and minimize potential risks. |
Conclusion
After exploring the ultimate guide to brow tinting and shaping, it’s clear that achieving perfect brows is within your reach. By following the step-by-step process and implementing the tips and techniques shared throughout this article, you can transform your brows into stunning, well-defined features that enhance your overall appearance.
Throughout the guide, we’ve emphasized the importance of understanding your natural brow shape, choosing the right tint, and properly maintaining your tinted brows. These key elements, combined with the correct application and post-tinting care, will ensure long-lasting results that you can be proud of.
Remember, brow tinting is a versatile technique that can be adapted to different brow shapes, and even natural, homemade tint options are available for those with specific preferences or concerns. Whether you decide to seek professional help or embark on a DIY journey, the possibilities for perfect brows are endless.
So, embrace this knowledge, experiment with different techniques, and discover the power of perfectly tinted and shaped brows. With practice and patience, you’ll unlock a new level of confidence and beauty, leaving no doubt that you are the master of your brow game. Here’s to achieving perfect, enviable brows!
FAQ
What is brow tinting?
Brow tinting is a semi-permanent treatment that involves coloring the brow hairs to enhance their appearance and create a fuller, more defined look. It is a popular technique for achieving perfect brows and can be done at home or by a professional.
How long does brow tinting last?
The longevity of brow tinting can vary depending on several factors, including your skin type, hair growth cycle, and aftercare routine. On average, brow tinting can last up to four to six weeks, but it may start to fade after two to three weeks.
Is brow tinting safe?
When done correctly and with safe products, brow tinting is generally considered safe. However, it’s essential to be cautious if you have sensitive skin or a history of allergic reactions. Always perform a patch test before tinting your brows and follow the instructions carefully to minimize any potential risks.
Can I tint my brows at home?
Yes, you can tint your brows at home using a brow tint kit. These kits typically come with all the necessary tools and instructions to help you achieve salon-quality results. However, it’s important to educate yourself about the process and follow the instructions carefully to avoid any mishaps.
How do I choose the right brow tint color?
When selecting a brow tint color, it’s crucial to consider your natural hair color and skin tone. Aim for a shade that is one to two shades darker than your hair color for a natural look. If you’re unsure, consult a professional or do a patch test to determine the best color for you.
Can I shape my brows before tinting?
It’s generally recommended to shape your brows before tinting them. By shaping your brows beforehand, you can ensure that the tint color is evenly distributed and enhances the desired shape. However, avoid any major changes in shape as it’s best to tint your brows to enhance their natural appearance.